An Introductory Guide to DNSDB Scout
DNSDB Scout® is a GUI for the DNSDB® API. Available in all popular web browsers via a website or browser extension, it supports all of the major features of the DNSDB API including:
- A Dashboard for making queries
- An API key status tracker
- Punycode support for converting Internationalized Domain Names (IDN)
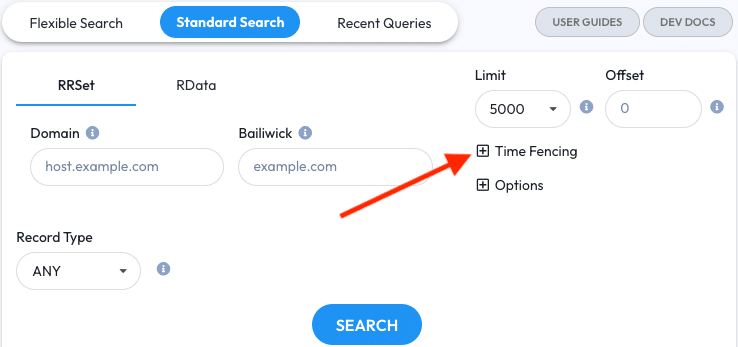
- Filters for queries, such as Time Fencing, Record Types, and Bailiwicks
- A locally stored history of recent queries for re-loading and re-running later
- Exporting of results to CSV, JSON, TXT, and PDF formats
- …and much more!
Until you are accustomed to working with passive DNS, DNSDB Scout’s form and function may seem confusing. The purpose of this guide is to introduce you to Scout and its many features by walking through a few of the most common DNSDB “pivots” and investigative exercises in DNSDB Standard Search. Understanding pivots is critical to utilizing DNSDB to its fullest potential.
DNSDB API Keys
To use DNSDB Scout you must have a DNSDB API Key.
If you’re already a DNSDB customer then your existing API Key will work just fine. If you don’t have an API Key yet then please contact the DomainTools sales team.
Google Chrome Extensions & Mozilla Firefox Add-ons
If you plan on using DNSDB Scout as a browser extension in either Google Chrome or Mozilla Firefox then the rest of this guide presumes that it’s already installed. If you haven’t installed it, please visit the store page for your respective web browser and install it.
- Google Chrome
- click Add to Chrome
- Mozilla Firefox
- click Add to Firefox
After the extension has been added to your browser, click the orange Scout icon in the top-right corner to bring up the Scout Popup menu. This is the primary way to open the Scout extension to check on your API key status and to navigate to the Dashboard and Options pages.
Website Version
DNSDB Scout can be accessed by visiting https://scout.dnsdb.info/ in any popular web browser, including on smaller devices like phones and tablets. Accessing DNSDB Scout this way may be preferred or required depending on your device owner’s restrictions, device platform restrictions, or web browser compatibility. Some platforms, such as iOS, do not allow for web browser extensions, and other web browsers may not have a DNSDB Scout extension release available yet.
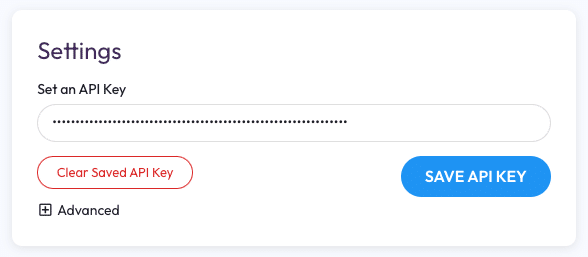
Setting an API Key in DNSDB Scout
Upon loading up DNSDB Scout for the first time you will likely encounter a message stating that your API Key hasn’t been set yet. DNSDB Scout doesn’t ship with a default API Key so you’ll need to set your own. To do this, visit the Options page by clicking the purple ‘gear’ icon near wherever you saw the warning message.

Most users will visit the Options page only once to set and save their API keys. Enter yours into the field and click the Save API Key button.
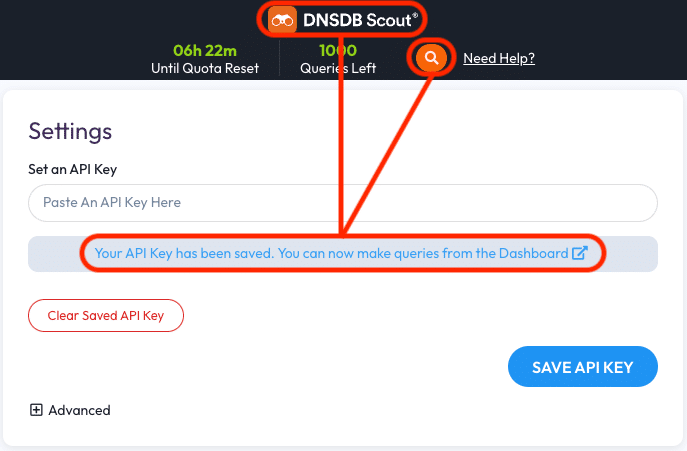
Upon clicking the save button DNSDB Scout will query the default DNSDB server for your API Key status to verify its validity. API Key status checks do not count against your DNSDB query quota and are free of charge.
If your API Key is valid then a confirmation message will appear and the API Status area at the top of the screen will update to resemble one of the following, depending on how your API Key was provisioned. The status will indicate how many DNSDB queries you have left and time until your API Key expires (if applicable):
| DNSDB Community Editon |  |
| DNSDB Trial and Standard Editions |  |
If your API Key isn’t valid then the API status area will revert to the message stating your API Key is expired or hasn’t been set yet. In this case ensure you’ve copy-pasted the correct API Key and try saving it again. If you continue to have trouble setting your API Key please contact our Technical Support team at [email protected].
Now you may make DNSDB queries on the Dashboard page. Click the DNSDB Scout logo, the link that appeared when you entered your API Key, or the purple search button to go to the Dashboard:
Common Pivot & Exercise #1: FQDNs to IP Addresses
Finding the IP Address for a Fully Qualified Domain Name (FQDN) is a simple task for a DNS server — it’s basically what they were made to do. However, the answer you’ll receive from a “regular DNS server” lacks any history and context.
$ dig www.farsightsecurity.com A +short
104.244.13.104
In the example above the dig command can only tell us what a FQDN is resolving to right now and for wherever the DNS server is located. Results from the dig command will be both time and location dependent.
DNSDB can provide a history and global observation for the same data, and thus add context to how a FQDN has resolved over time. To do this in DNSDB Scout for the same FQDN:
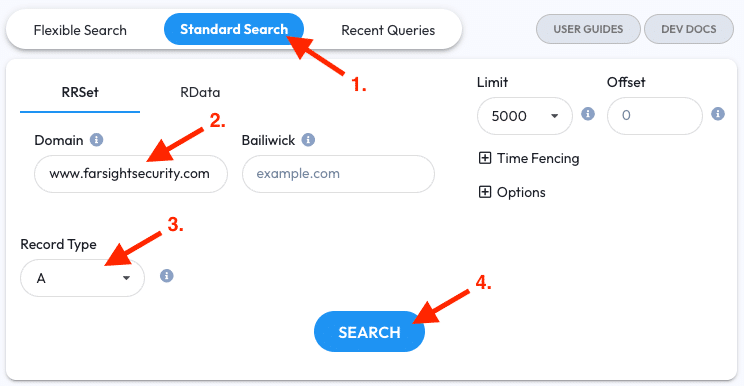
- Go to the Standard Search tab
- Enter
www.farsightsecurity.cominto the RRSET Domain field - Restrict the RRType field to A records
- Click the Search button
The results that appear give us a timeline of what www.farsightsecurity.com been resolved to using DNS servers worldwide:
- Currently resolves to 104.244.14.13
- Previously resolved to 104.244.14.95 from Aug 2020 to Jan 2021
- Previously resolved to 104.244.14.108 from Sep 2018 to Aug 2020
- Previously resolved to 104.244.13.104 from Apr 2015 to Sept 2018
- Previously resolved to 66.160.140.81 from Sept 2013 to Apr 2015
- Previously resolved to 149.20.4.207 from Jul 2013 to Sept 2013
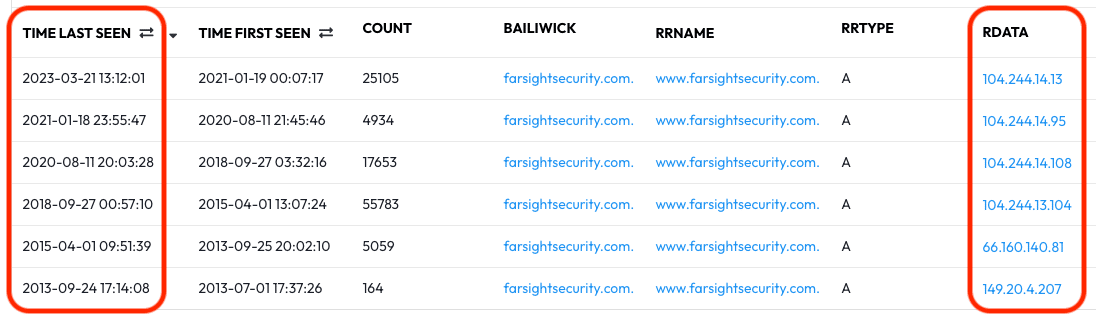
From this simple query we now know how long this subdomain has existed and where it has been before — that’s a very powerful capability!
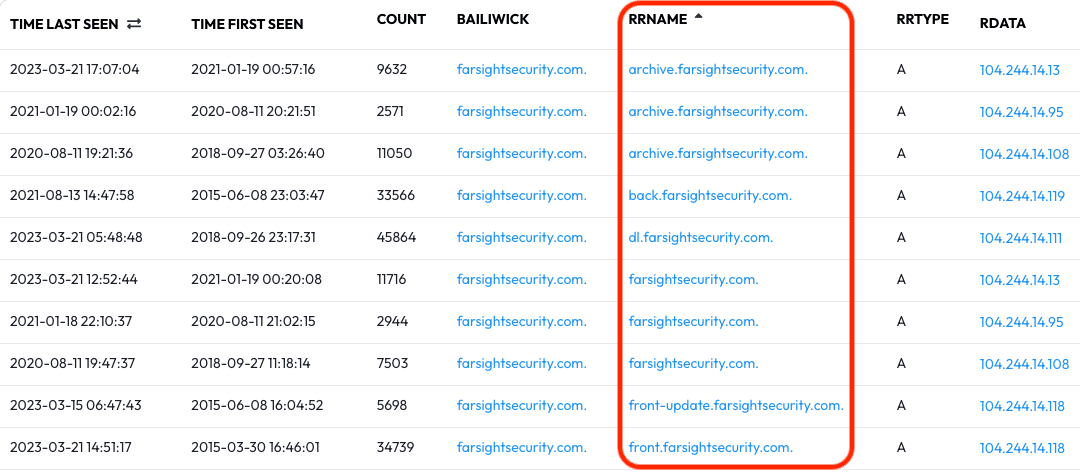
Common Pivot & Exercise #2: IP Addresses to FQDNs
An IP address is a great starting point for an investigation. With normal DNS you can sometimes find what host currently resides at a given IP address by using in-addr and PTR records.
$ dig -x 104.244.13.104 +short
archive.farsightsecurity.com.
Like in the previous exercise, dig is great for telling us what’s happening now from
the perspective of a given DNS server. But what if we want more?
DNSDB can provide the history and context for FQDNs sharing a common IP address. To do this in DNSDB Scout:
- Go to the Standard Search tab
- Switch over to RData mode from RRSet mode so we can search the right-hand response/answer part of a DNS record instead of the left-hand query part
- Select the IP or Network option
- Enter
104.244.13.104into the Record Data field - Click the Search button
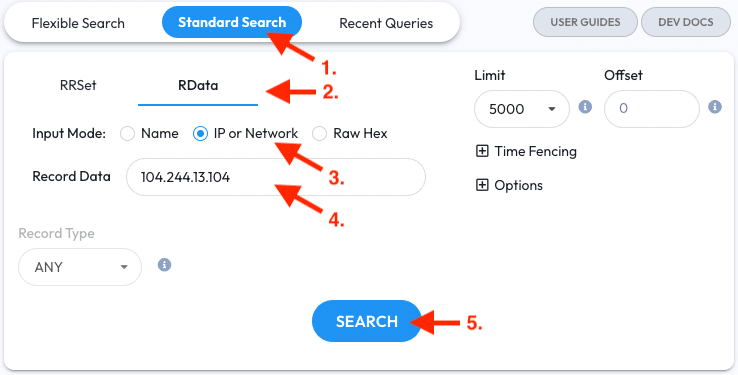
In the results that appear we can make a list of all of the FQDNs that have been observed resolving to 104.244.13.104.
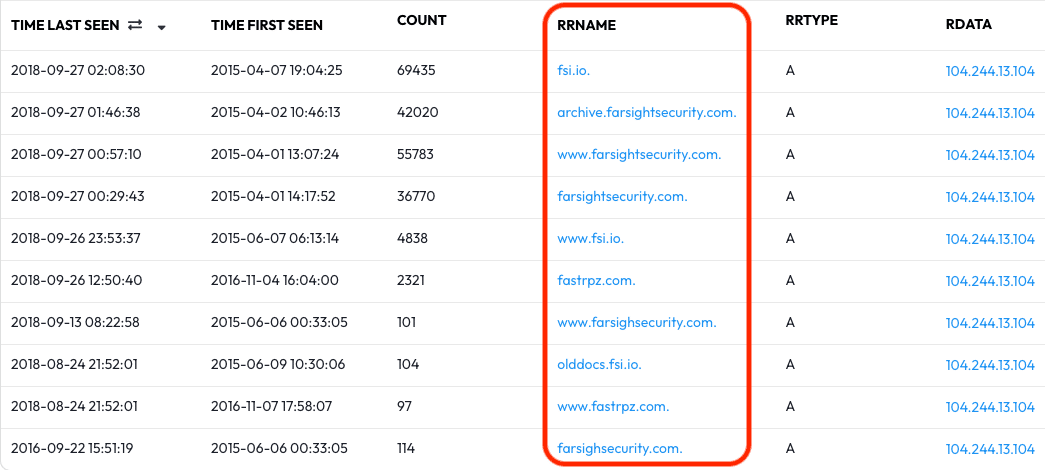
Utilizing this pivot you may find that hundreds or thousands of domains have shared or are sharing an IP address. Sometimes these may be totally unrelated domains from multiple unrelated owners. Other times you may find that an IP address is commonly used by a single owner for multiple brands, or for hosting a particular theme of traffic — you’ll often be able to see this based on the naming schema of the FQDNs you find.
Caution: The domains you find with this method may not be harmless or may be purposefully misleading. Take precautions if you decide to probe the results outside of DNSDB Scout.
Common Pivot & Exercise #3: IP Address Range to Domain Names
During an investigation it’s helpful to check out an entire netblock instead of IP addresses individually. DNSDB and DNSDB Scout support CIDR range queries to facilitate this. Additionally, it can be useful to only focus on recent activity — this sort of “time fencing” is also supported.
Let’s continue using the recent activity in Farsight’s own address space as an
example — let’s see what domain names have been seen using the 104.244.14.108
to 104.244.14.111 address range in the last week.
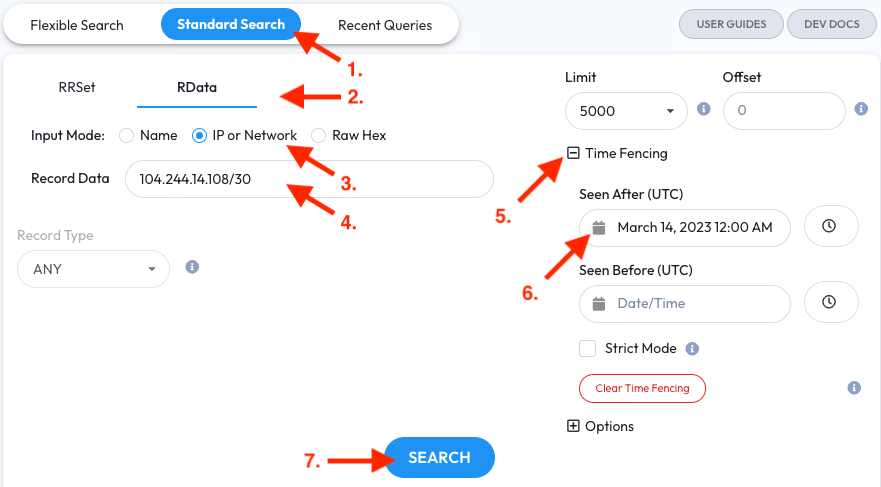
In DNSDB Scout:
- Go to the Standard Search tab
- Switch to RData mode like in the previous pivot
- Select the IP or Network option
- Enter
104.244.14.108/30into the Record Data field. The CIDR block represents the IP address range above - Expand the Time Fencing section and select a date from a week ago for the ‘Seen After’ option to restrict the query to the last week of observations.
- In this example case, that would be March 24, 2023 12:00 AM UTC
- Click the Search button.
In the results that appear we can make a list of the domains that have recently been seen using the given address range over the last week.
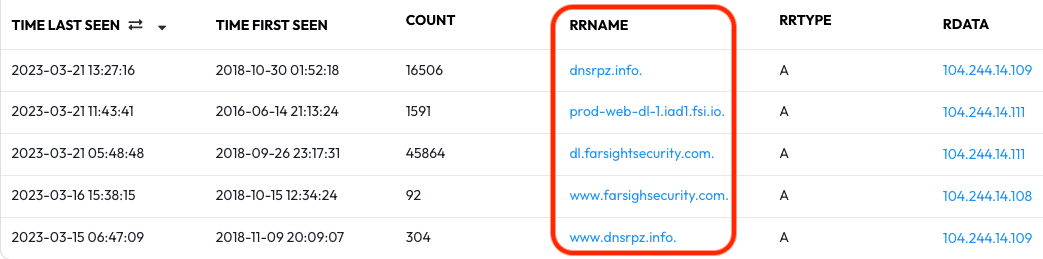
This pivot is also called the “Know Your Neighborhood” exercise. By exploring a netblock you may find new names you didn’t know about previously and get a better feel for what a “neighborhood” of the Internet is like — however, explore with skepticism as any domain name owner can point one of their hostnames “at” any IP address of their choice and generate traffic.
Caution: Keep in mind the Count and UTC Dates of the data you find; you may need to interpret your results differently depending on the frequency and time range. A low frequency result from a long time ago may be a “test” server, and spikes over short time ranges could be worth a closer look. UTC Dates can also blend together if you’re not reading closely; check both the Time Last Seen and Time First Seen columns before making a conclusion about a FQDN and its activity in regard to your investigation.
Common Pivot & Exercise #4: Subdomain Wildcards
While investigating a domain you may need to create a map of unknown subdomains and hostnames. Normally this could be challenging, but DNSDB and DNSDB Scout significantly simplify this task.
To perform a subdomain and hostname search in DNSDB Scout:
- Go to the Standard Search tab
- Enter a domain with a subdomain wildcard in front of it — in this example we’ll use
*.farsightsecurity.comin the RRSet Domain field. Wildcards like this can be placed at either end of a FQDN or label, but not both. - Restricting the Record Types to A, AAAA, or CNAME will help add some clarity — intermingled record types can be hard to parse if you’re not familiar with all of their uses. For this exercise we’ll restrict the Record Types to A records
- Additionally restricting the query to a specific time range will also add clarity. Open the Time Fencing Section
- Set a ‘Seen After’ time fence for observations after January 1, 2020 12:00 AM UTC
- Click the Search Button

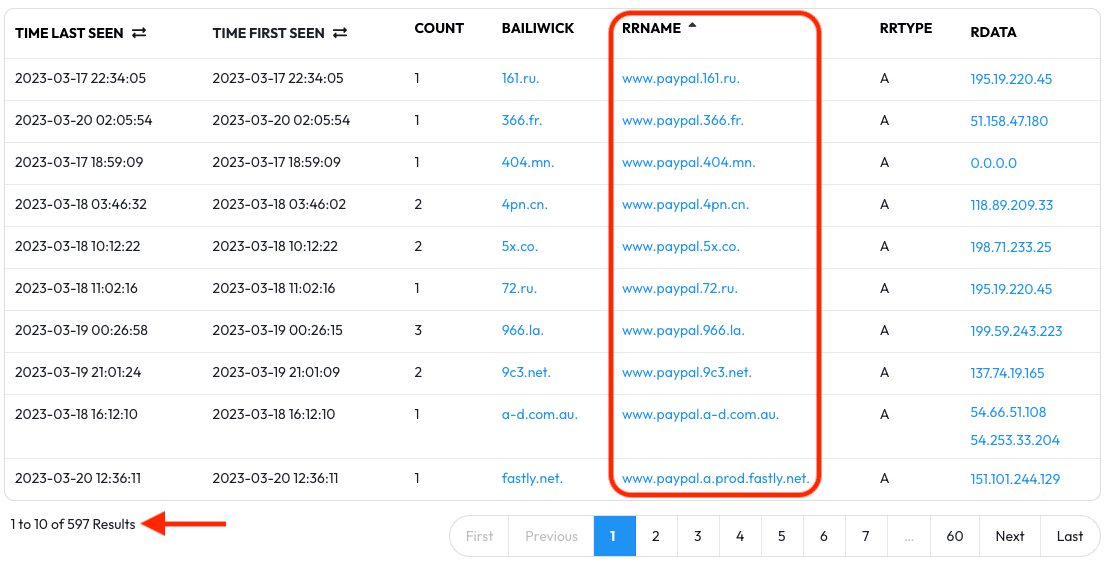
The results that appear can be sorted for increased readability — click the RRName heading to alphabetize the results. With sorted results we now have a list of subdomains and hostnames observed since the beginning of 2020.
Repeat this pivot with a different Record Type (AAAA, CNAME, or ANY) for a different view of the observed traffic.
Common Pivot & Exercise #5: Hosts Using A Shared Name Server
Another way to discover associated hostnames beyond subdomains and IP addresses is to explore shared name servers. This is a two-step pivot and can lead to a lot of results.
In this example we’ll go through the exercise while examining the Smithsonian
Institution’s domains from the starting point of si.edu.
Let’s set up the first step of this pivot — finding a name server.
- Go to the Standard Search tab
- Enter
si.eduinto the RRSET Domain field - Restrict the Record Type to NS
- Set the Limit to 1000 (optional)
- Click the Search Button
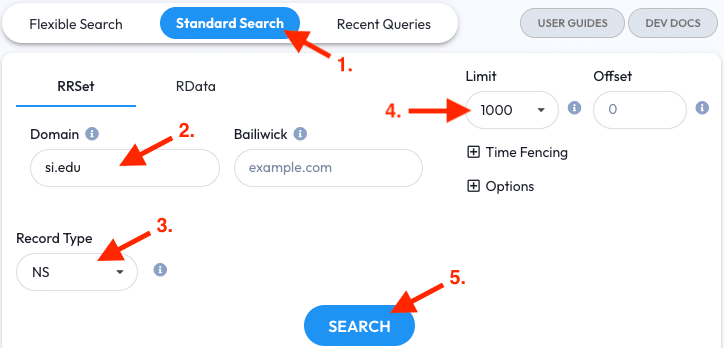
A recent observation for this example should be a high-count name server record with the data: si-names1.si.edu. and si-names2.si.edu.

Hover over the first name server and it’ll present you with a pivot tooltip. In the tooltip will be a number of pivot options. Clicking second pivot option, which says Standard for RData (name): si-names1.si.edu., will perform the next step of this exercise automatically — DNSDB Scout will search for an RData Name matching si-names1.si.edu. while also using the Record Type and Limit fields we set earlier. The query form at the top of the page will change automatically, and the results will be displayed in the table. Click the pivot link to proceed.
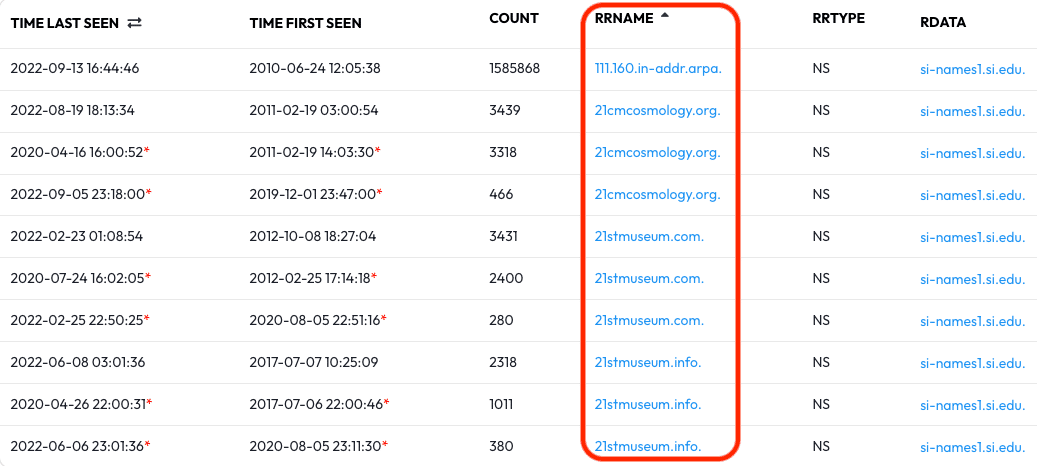
The results that appear after clicking the pivot link can be sorted for increased
readability — click the RRName heading to alphabetize the results. With the sorted
results we now have a large list of hosts and domains to paginate through that use
si-names1.si.edu. as a shared name server.
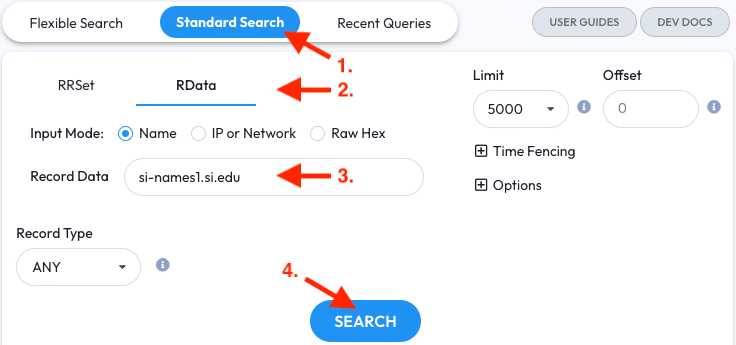
Running this pivot in two steps isn’t required. If you already have a name server to start with then you may enter it as a name in an RData query to skip step one.
- Go to the Standard Search tab
- Switch to RData mode
- Enter the name server into the Record Data field
- Click the Search Button
Common Pivot & Exercise #6: Hosts Using A Shared MX Server
Similar to the previous exercise, another way to discover associated hostnames is to explore shared mail servers. This is also a two-step pivot that could yield a lot of results depending on the starting domain.
In this example we’ll go through the exercise while examining the University of
Oregon’s mail server and domains, starting from uoregon.edu.
Let’s set up the first step of this pivot — finding a mail server
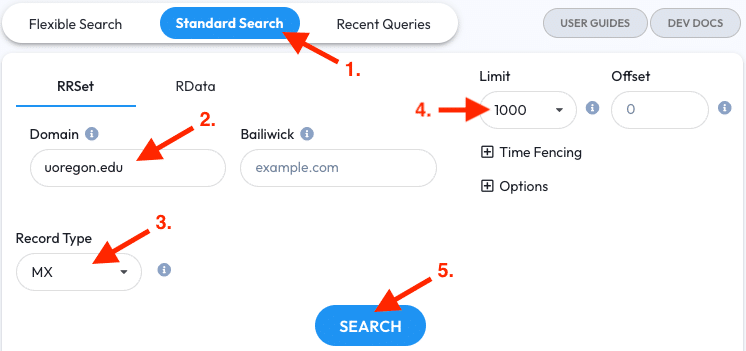
- Go to the Standard Search tab
- Enter
uoregon.eduinto the RRSET Domain field - Restrict the Record Type to MX
- Set the Limit to 1000 (optional)
- Click the Search Button
In the most recent observation for this example should be a high-count MX record with mxa-000bfd01.gslb.pphosted.com. in the record data.
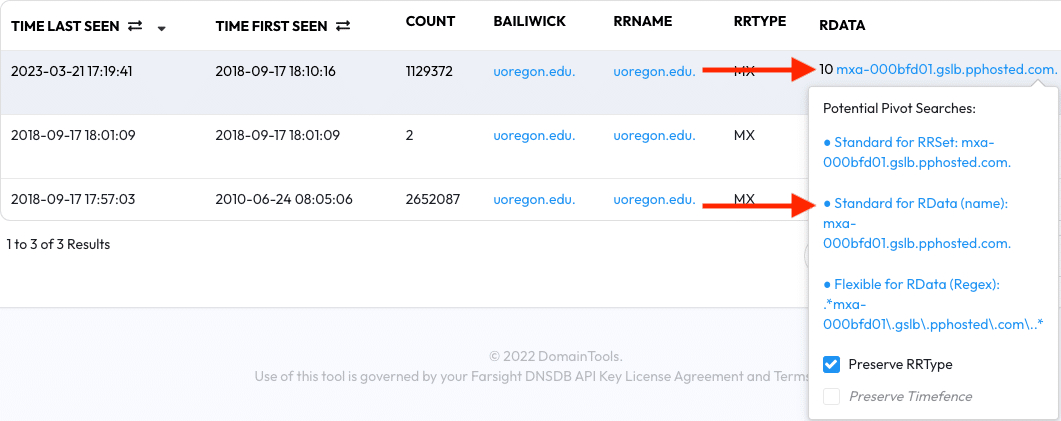
Hover over the mailserver and it’ll present you with a pivot tooltip. In the
tooltip will be a number of pivot options. Clicking second pivot option, which
says Standard for RData (name): mxa-000bfd01.gslb.pphosted.com., will perform
the next step of this exercise automatically — DNSDB Scout will search for an
RData Name matching mxa-000bfd01.gslb.pphosted.com. while also using the
Record Type and Limit fields we set earlier. The query form at the top of the
page will change automatically, and the results will be displayed in the table.
Click the pivot link to proceed.
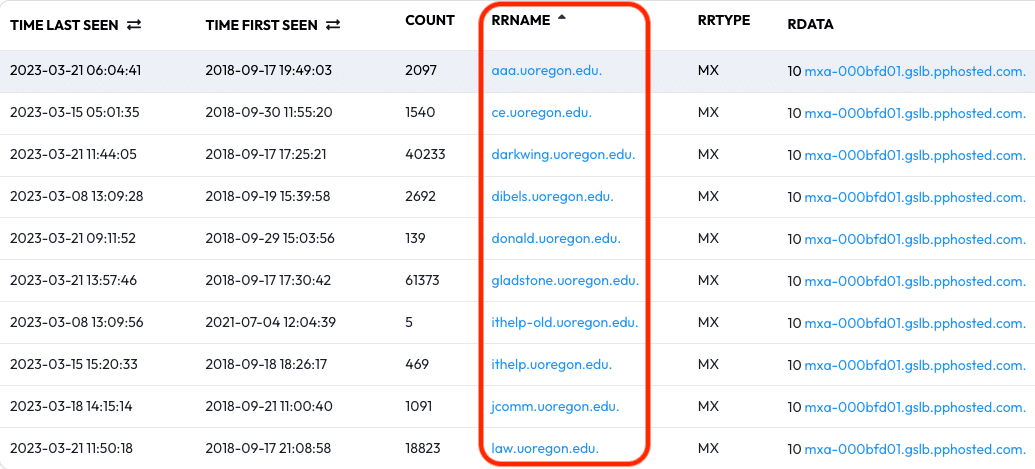
The results that appear can be sorted for increased readability — click the RRName heading to alphabetize the results. With the sorted results we now have a list of hosts and domains that use mxa-000bfd01.gslb.pphosted.com. as a shared mail server.
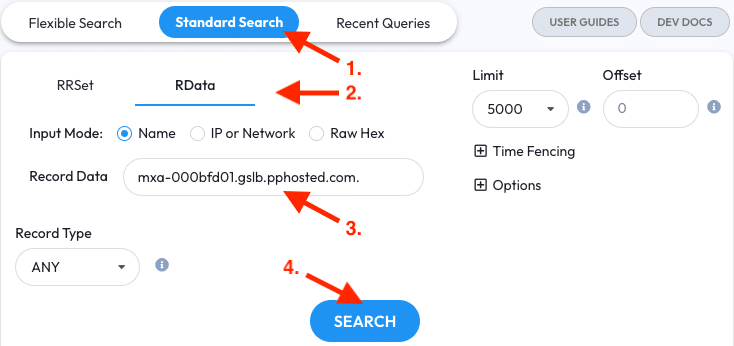
Like in the previous exercise, running this pivot in two steps isn’t required. If you already have a mail server to start with then you may enter it as a name in an RData query to skip step one.
- Go to the Standard Search tab
- Switch to RData mode
- Enter the mail server into the Record Data field
- Click the Search button
Common Pivot & Exercise #7: Hosts Using a Shared CNAME
Similar to the previous two exercises, another way to discover associated domains is to explore shared CNAMEs. This is another two-step pivot that could yield a lot of results depending on the starting domain.
In this example we’ll go through the exercise starting from the University of
Oregon’s website, www.uoregon.edu.
Let’s set up the first step of this pivot — finding a CNAME
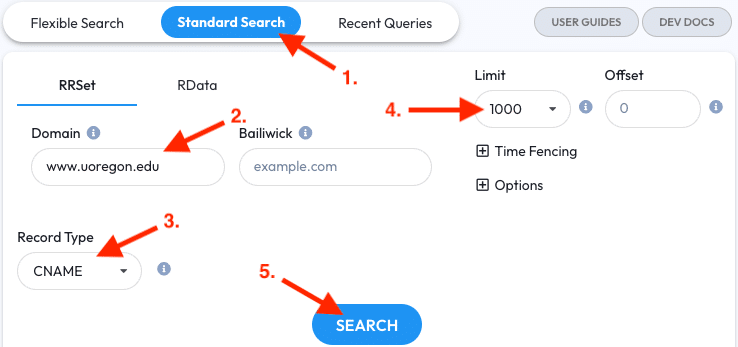
- Go to the Standard Search tab
- Enter
www.uoregon.eduinto the RRSET Domain field - Restrict the Record Type to CNAME
- Set the Limit to 1000 (optional)
- Click the Search Button.
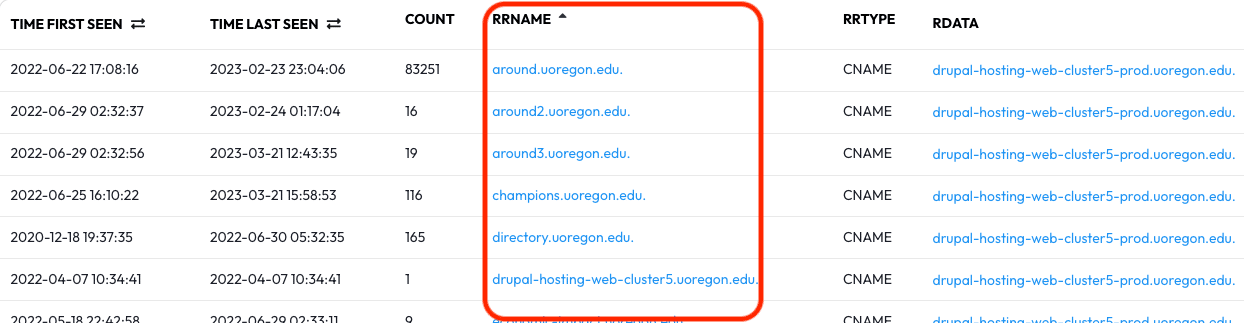
In a recent observation for this example should be a CNAME record with drupal-hosting-web-cluster5-prod.uoregon.edu. in the record data.

Hover over the CNAME and it’ll present you with a pivot tooltip. In the tooltip
will be a number of pivot options. Clicking second pivot option, which says
Standard for RData (name): drupal-hosting-web-cluster5-prod.uoregon.edu., will
perform the next step of this exercise automatically — DNSDB Scout will search
for an RData Name matching drupal-hosting-web-cluster5-prod.uoregon.edu. while
also using the Record Type and Limit fields we set earlier. The query form at
the top of the page will change automatically, and the results will be displayed
in the table. Click the pivot link to proceed.
The results that appear can be sorted for increased readability — click the RRName heading to alphabetize the results. With the sorted results we now have a list of hosts and domains that use drupal-hosting-web-cluster5-prod.uoregon.edu. as a shared CNAME.
Notably, in this case we see enumerated subdomains and CNAMEs — there may be a
www3.uoregon.edu. or a drupal-hosting-web-cluster4-prod.uoregon.edu. that could be worth
investigating in subsequent queries. This is one of many patterns to watch for when
investigating subdomains and CNAMEs.
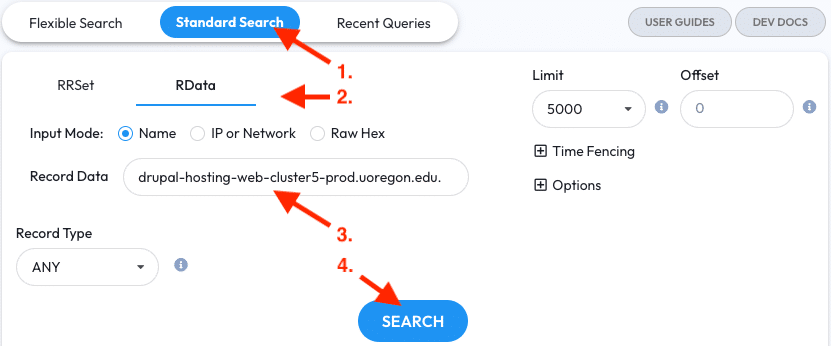
Like in the previous two exercises, running this pivot in two steps isn’t required. If you already have a CNAME to start with then you may enter it as a name in an RData query to skip step one.
- Go to the Standard Search tab
- Switch to RData mode
- Enter the CNAME into the Record Data field
- Click the Search Button
Common Pivot & Exercise #8: TLD and Suffix Wildcarding
DNSDB supports wildcards before or after a given search parameter — this is particularly useful when searching for similar names across multiple TLDs and suffixes.
For example, www.paypal.com is a well-known website — but has
www.paypal recently appeared on any other TLDs and suffixes besides .com?
Let’s find out.
In DNSDB Scout:
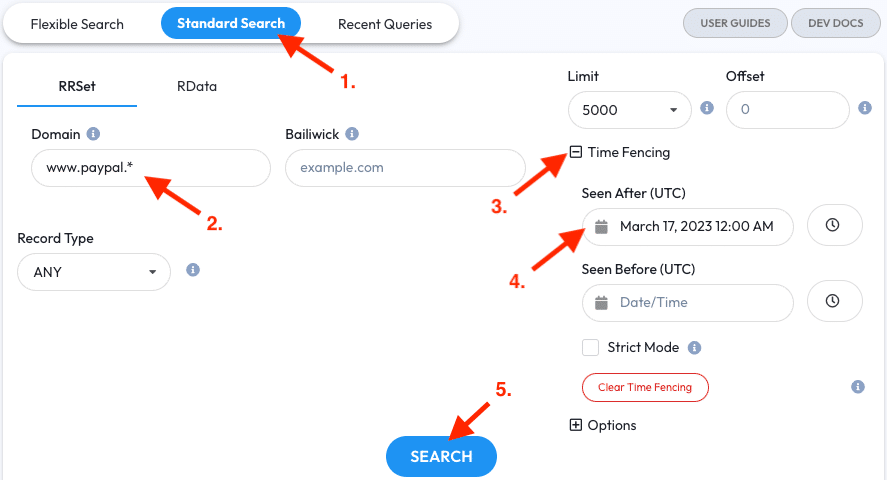
- Go to the Standard Search tab
- Enter
www.paypal.*into the RRSet Domain field to set up a right-hand wildcard query - Open the Time Fencing section
- Set a ‘Seen After’ Time Fence for the last couple of days. In this example case March 17, 2023 12:00 AM UTC will be used
- Click the Search Button
Note: Right-hand wildcard queries take longer than other queries because of the large amount of data DNSDB is searching. Results for right-hand wildcard queries may take some time to appear. The results for this query can be highly varied depending on RRType, Time Fencing, and current events. Try lowering the Limit to decrease the amount of time these queries take.
In the results that appear we can make a list of all the domains, subdomains, and hosts that match our query.
Caution: A common use case for this pivot is to search for domains and websites that look similar to a canonical/real one. The domains and hosts you find with this method may not be harmless or may be purposefully misleading. Take precautions if you decide to probe the results outside of DNSDB Scout.
Common Pivot & Exercise #9: Punycode, Unicode, and Internationalized Domain Name Conversions
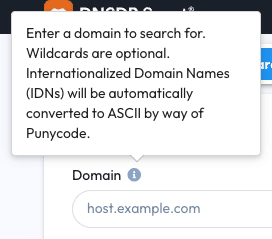
DNSDB Scout Standard Search supports converting Internationalized Domain Names (IDNs) containing Unicode and Unicode suffixes to ASCII by way of Punycode.
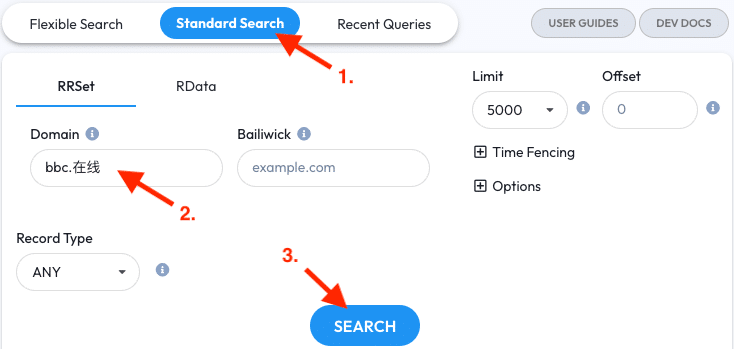
For example, the domain bbc.在线 is used to host an instance of a BBC news website. The suffix, 在线, is an internationalized domain name suffix meaning “online” in simplified Chinese. The characters 在线 are written in Unicode, but to make it usable in DNS something called “punycode” is used as a conversion layer. With Punycode, this Unicode suffix is converted to xn--3ds443g. In DNS, all IDN conversions will begin with xn--.
For more information about the What/How/Whys of IDNs and Punycode, we recommend:
The Standard Search Domain tooltip has an indicator of whether or not your web browser has allowed Punycode conversions to work. By default, all major web browsers will allow it, but some script blockers may disable it and a warning will appear.
As an exercise, try entering an IDN into Scout as part of a basic RRSet Domain query. If you don’t know one off the top of your head, try bbc.在线.
IDNs, Unicode, homoglyphs, and non-ASCII characters may come up in investigations that would stump other tools. DNSDB Scout will automatically convert these using Punycode for use in DNSDB queries.
Even if you don’t intend to go on to make a real query, DNSDB Scout can be used as a convenient convert-to-punycode tool.
Feature Explanation: Recent Queries
DNSDB Scout stores your DNSDB queries locally, via your web browser’s cache. This is convenient for re-running and loading previous queries, but this may also be something you’ll want to explicitly clear if you’re conducting a sensitive investigation on a shared system.
Some web browsers will automatically prune your Recent Query cache; if not, DNSDB Scout will self-prune whenever 2GB of queries have been stored or 75 queries have been made (the specific details of the pruning process will depend on which web browser you’re using).
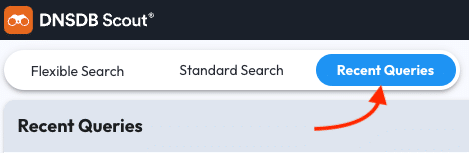
To review queries you’ve previously made, click the “Recent Queries” tab in the Dashboard.
In the Recent Queries tab is a table that shows all of your previous queries.

Each query has a few functions:
- The Re-Run button will perform the query again, from scratch, to fetch new results. This can be useful if a domain is rapidly updating
- The View button will load the query from cache and display it in the Dashboard. This is useful if you want to re-export a query into a CSV or JSON file later on
- Clicking the Request of a query will expand the query to its raw form, revealing the raw API URL, HTTP Status code, and other information about the query when it was performed. This can be useful for documenting or debugging a query that you’ve run
At the top-right of the Recent Queries tab is a button to clear the Recent Queries completely. If your Recent Queries are taking a while to load then you may want to clear them manually.
Feature Explanation: Time Fencing
Time Fencing is used to improve the signal to noise ratio of results by filtering results to specific time ranges that are more relevant to an investigation or event.
Time Fencing is controlled by a set of three query parameters, all of which are optional:
- Seen After: Allows for results where they were observed after a given date. This is the most frequently used Time Fencing option in DNSDB Scout.
- Seen Before: Allows for results where they were observed before a given date.
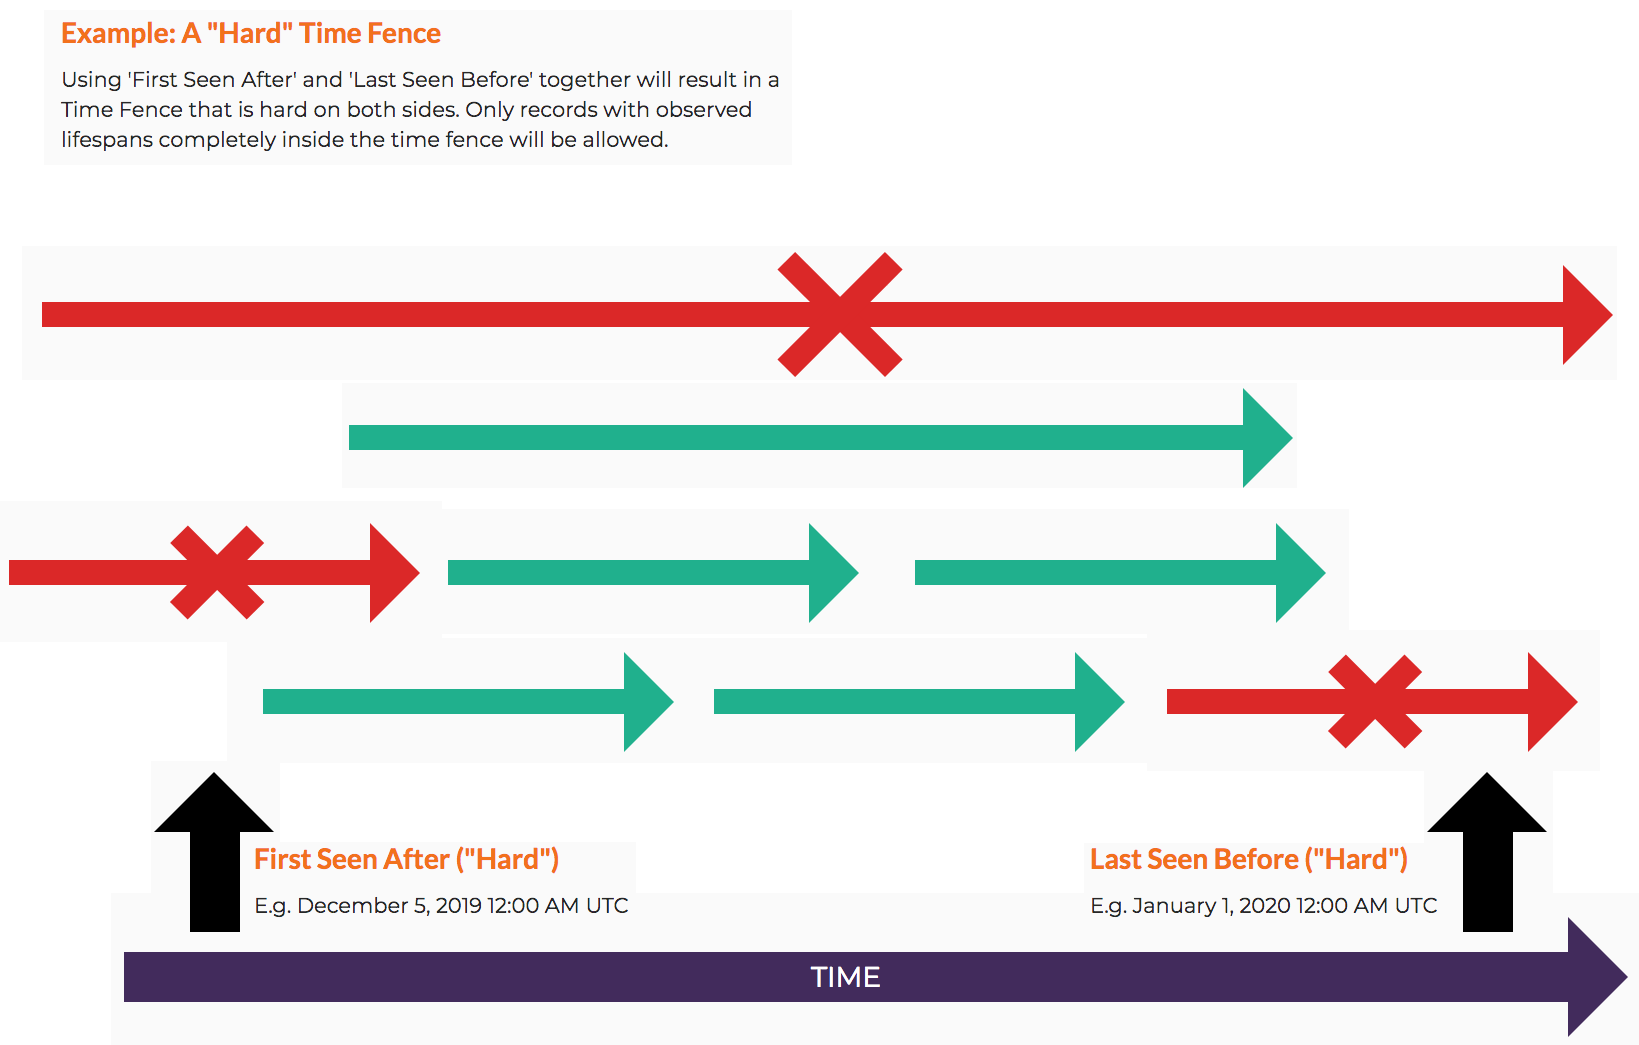
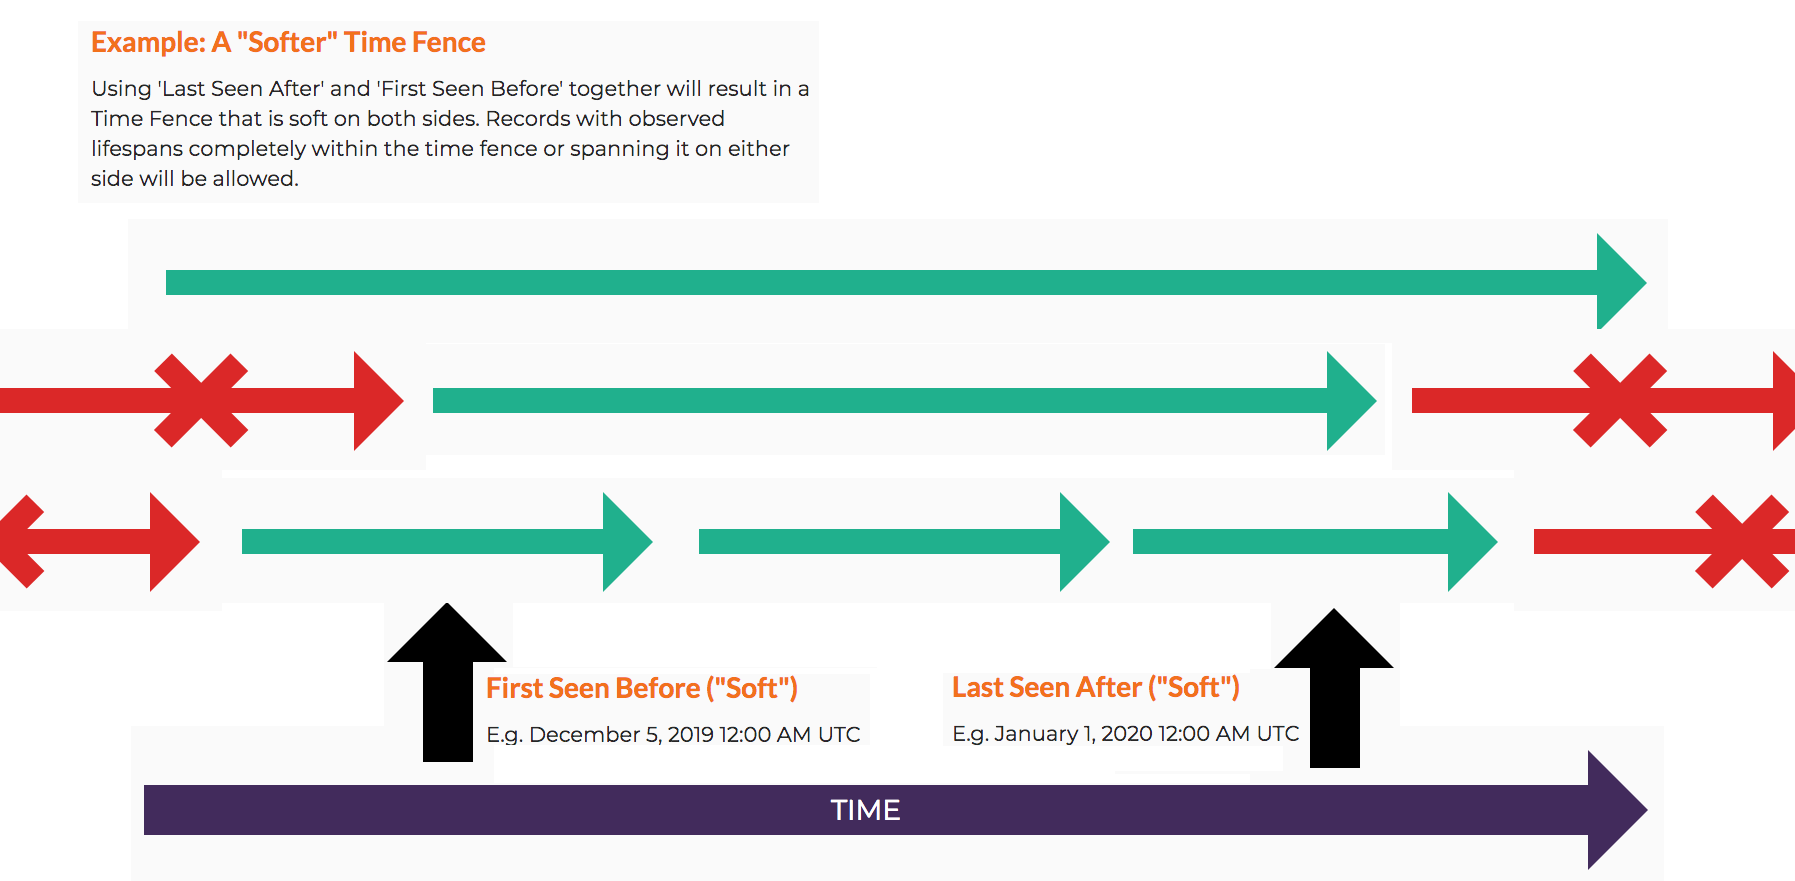
- Strict Mode: Only allow for observations that fall strictly on the specified side of a Time Fence. If enabled and both Time Fences are used then the observations will be strictly between the Time Fences. This is also known as a ‘complete’ Time Fence.
By itself, the Seen After parameter defines a ‘soft’ limit for a date range and kicks off a ‘Last Seen After’ query where observations have a Last Seen date sometime after the date specified. When the Strict Mode is enabled, the Seen After parameter defines a ‘hard’ limit and kicks off a ‘First Seen After’ query where observations have a First Seen date sometime after the date specified. These types of queries are exclusive; you cannot use both a ‘Last Seen After’ and ‘First Seen After’ query at the same time.
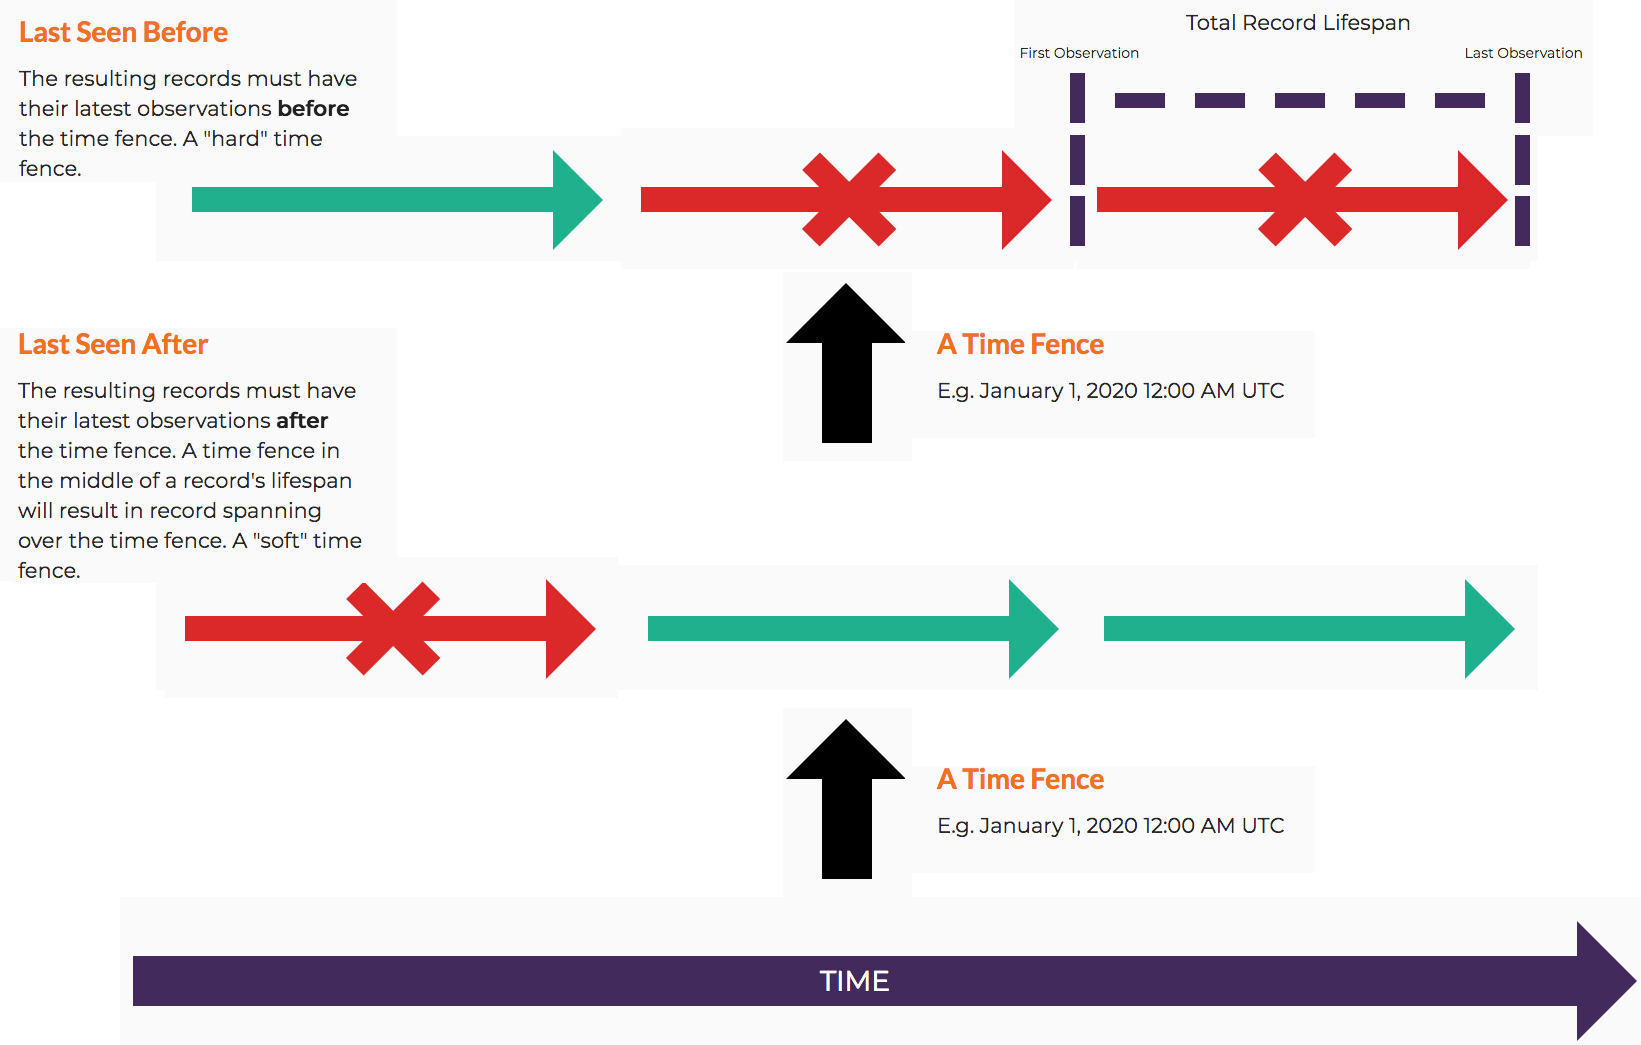
Similarly, the Seen Before parameter define a ‘soft’ limit for a date range and kicks off a ‘First Seen Before’ query where observations have a First Seen date sometime before the date specified. When the Strict Mode is enabled, the Seen Before parameter defines a ‘hard’ limit and kicks off a ‘Last Seen Before’ query where observations have a Last Seen date sometime before the date specified. These types of queries are exclusive; you cannot use both a ‘First Seen Before’ and ‘Last Seen Before’ query at the same time.
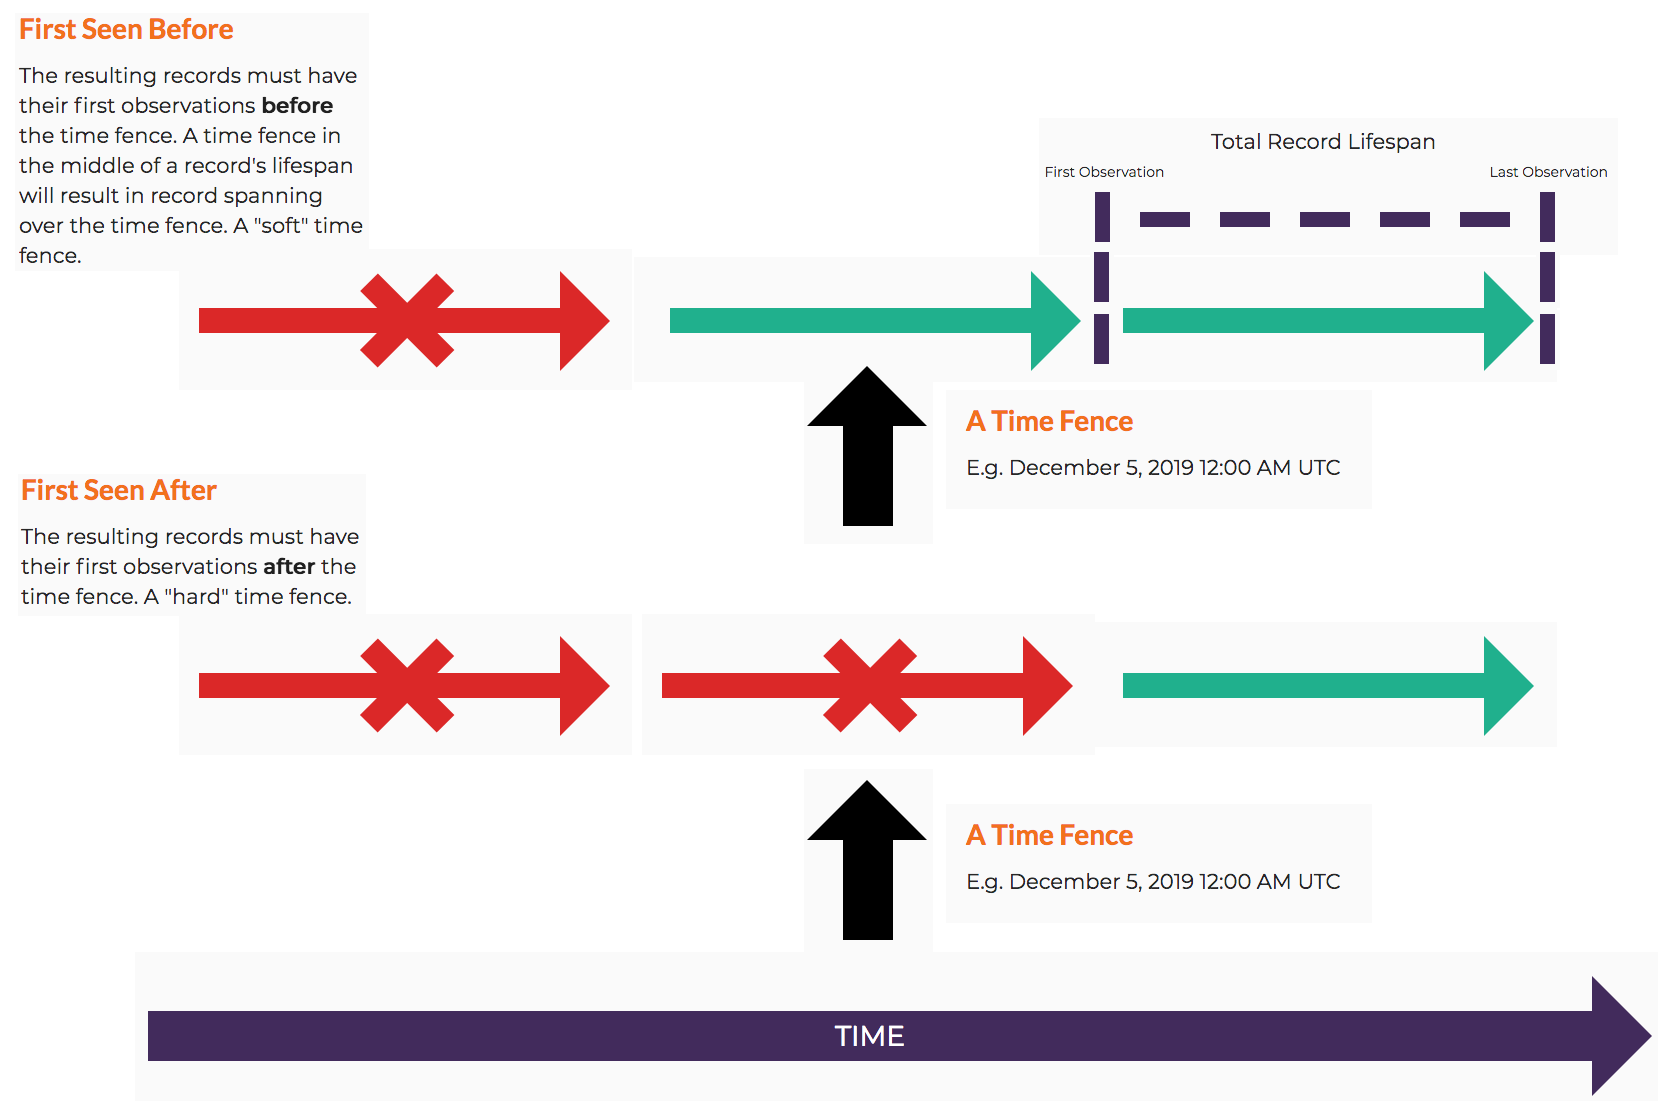
Using both Seen After and Seen Before parameters together define a left bound and right bound date range for query results, and the Strict Mode defines their strictness. When looking at a timeline, the Seen After is used as the left bounding parameter while Seen Before is used as the right bounding parameter. Results that appear in-between satisfy the either the Seen After parameter, the Seen Before parameter, or both simultaneously.
In DNSDB Scout the Time Fencing parameters have their own section. Click the [+] Time Fencing header to expand the section. Once expanded, the fields for entering the Seen After and Seen Before parameters will appear. Click the header again to hide the section.
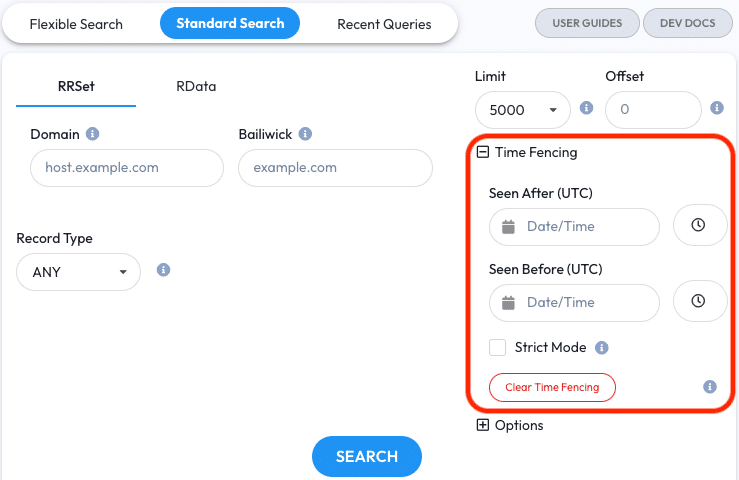
DNSDB and DNSDB Scout operate using Coordinated Universal Time (UTC); when selecting a Time Fencing date it will be in UTC.
Click a Time Fencing field to open a date picker — in order, select the Year, Month, Day,
Hour, and Minute for the date you want. DNSDB Scout also supports Unix timestamp
conversion. Typing or pasting in a Unix timestamp will automatically convert it to a human
readable date. For example, copy-pasting 1577959872 into a field will result in January 2, 2020 10:11 AM.
The Clear button in the Time Fencing section only applies to the Time Fencing fields. Use this to quickly clear Time Fencing parameters between queries as needed.
For a more in-depth exploration into DNSDB Time Fencing we recommend
Feature Explanation: Exporting to CSV, JSON, and PDF/Print
After running a successful query or loading a query from the Recent Query tab a table of results will appear on the main Dashboard. Just above the results is an ‘Export’ dropdown — the CSV option will export the current table to a CSV file while the JSON option will export the current table to a JSON file. The JSONL option is a variation of JSON format where each result is on a newline The TXT option exports the results in a text format resembling dig command output. The PDF/Print option will take you to a new tab to help optimize the table results for paper-like formats. If you have filtered your results using the fields just above the table then the ‘Export Filtered’ options will be enabled. Your browser will handle the file exporting process and will store it in your default downloads directory.
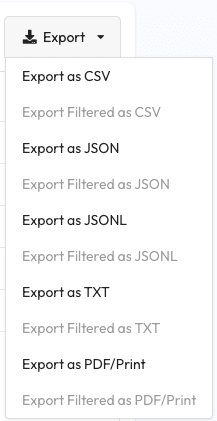
Use these export options to transfer your query results to another tool and format.
Feature Explanation: CNAME Chasing
DNSDB Scout includes a CNAME Chasing feature to resolve CNAME chains to a final A or AAAA record. With CNAME Chasing enabled Scout will repeatedly pivot on the latest available CNAME. This helps answer the question “where does this CNAME record actually point?” as quickly as possible.
The CNAME Chasing checkbox is available in Standard Search. The checkbox can be accessed and enabled/disabled when the CNAME RRType is selected:
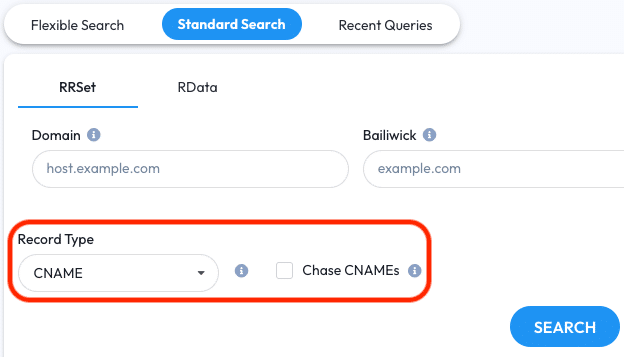
When a CNAME Chasing query is performed Scout will “chase” the latest CNAME chain and will then provide a summary report for one of three outcomes:
- Scout finds an A or AAAA record, successfully ending the chase.
- Scout cannot find a CNAME, A, or AAAA record to follow, indicating an incomplete chase.
- Scout reaches its chase limit or API quota limit and cuts the chase short. The typical chase limit is 10; Scout Export installations have a limit of 25.
In the Recent Queries tab you can review previous queries that were part of a CNAME chase; these queries have the [CNAME Chase] label.
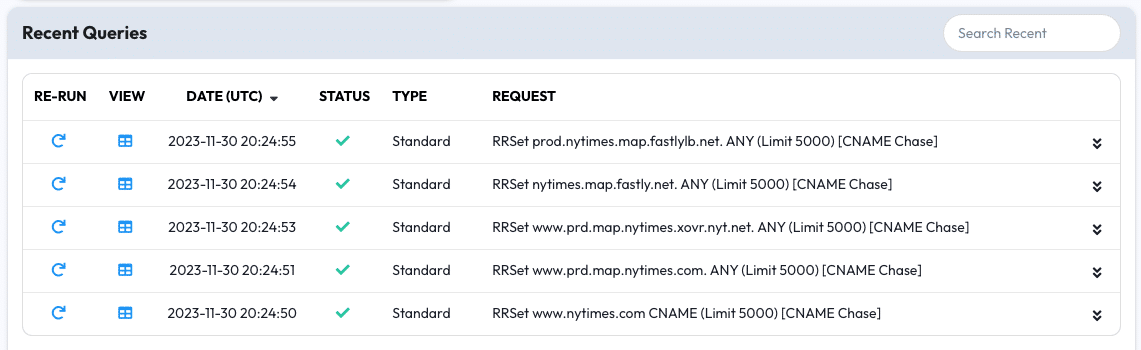
Examples
Using www.nytimes.com we can see a completed and successful chase that includes five steps:
Successful Query for: RRSET prod.nytimes.map.fastlylb.net ANY(Limit5000)[CNAME Chase]
Found 35 results

CNAME Chase Sequence:
www.nytimes.com → www.prd.map.nytimes.com.
 www.prd.map.nytimes.com → www.prd.map.nytimes.xovr.nyt.net.
   www.prd.map.nytimes.xovr.nyt.net. → nytimes.map.fastly.net
     nytimes.map.fastly.net → prod.nytimes.map.fastlylb.net
       prod.nytimes.map.fastlylb.net → 146.75.53.164
Using abc.com we can see an incomplete and unsuccessful chase because there are not any CNAMEs to follow from the initial starting point:
Successful Query for: RRSet abc.com CNAME (Limit 5000) [CNAME Chase]

The API server processed the query but there are no results to display.

CNAME Chase Sequence:
abc.com → Chasing incomplete; can't follow CNAME.

No CNAME records were found from initial starting point.
You may want to try using a different RRType.
Summary
If you have followed this guide to the end then you should now be familiar with all of DNSDB Scout’s major features as well as the more common DNSDB pivots. We hope that it has been both enlightening and useful.
If you have any feedback or would like to see us break down more complicated DNSDB pivots in the future please contact us and let us know.
Glossary of Acronyms and Terms
- General
- DNSDB: Farsight Security’s trademarked name for the Domain Name System Database that stores and indexes passive DNS data. The data in DNSDB comes from Farsight Security’s Security Information Exchange, ICANN’s CZDS and ZFA programs, and active enrichment efforts.
- GUI: Graphical User Interface or “Point and Click” interface. A set of visual elements (buttons, etc) you can interact with beyond text.
- API: Application Programming Interface; a set of established rules and parameters that a client program can use to communicate with a host program.
- Pivot: A sequential step between two sets of data, linked by some common factor or shared data element. Exploring DNSDB usually takes the form of following pivots.
- Files
- CSV: Comma Separated Values is a file format making use of commas as a delimiter between data fields. Typically used in spreadsheet tools.
- JSON: Javascript Object Notation is a file format used to contain human readable text in key-value pairs and array formats. Commonly used in web browsers and smaller scale databases. Originally created for Javascript, but it is now used in a wide range of tools.
- JSONL: Similar to JSON (above) but each Object is separate from the rest and uses its own line.
- Networking
- CIDR: Classless Inter-Domain Routing. A succinct way of expressing the size or range of a block of network addresses.
- E.g. 1.2.3.0/30 represents 1.2.3.0 thru 1.2.3.3 (four IP addresses).
- E.g. 1.2.3.0/25 represents 1.2.3.0 thru 1.2.3.127 (128 IP addresses).
- E.g. 1.2.3.0/24 represents 1.2.3.0 thru 1.2.3.255 (256 IP addresses).
- CIDR: Classless Inter-Domain Routing. A succinct way of expressing the size or range of a block of network addresses.
- DNS
- FQDN: Fully Qualified Domain Name; a domain name that has all of elements required to make it unambiguous when parsing. At minimum, from right to left, one is comprised of a period, top level domain, a period separator, and a name. E.g.
example.com. - RRSET: A set of DNS resource records containing or aligned by the same name, class, type, or bailiwick.
- Count: The number of times a unique RRSet was observed.
- Time Last Seen: The most recent time that an RRSet was observed.
- Time First Seen: The first time that an RRSet was observed.
- RRName: The queried left hand side of a DNS resource record.
- RData: The resulting right hand side of a DNS resource record.
- Bailiwick: An enclosing zone for a name server that serves the RRset or the name of the zone containing the RRset. Oversimplified, it’s usually the suffix, TLD, or authoritative resource for a record when observed.
- TLD: Top Level Domain, the right-most significant part of a FQDN. There are over 1,500 TLDs to date, and more are being added. E.g.
.com,.uk,.devand .在线 are all valid TLDs. - Wildcard: A value that acts as a placeholder for all possible values, represented by a * (star). In DNS, a wildcard can be interpreted as “everything in” something else. E.g.
*.example.comrepresents all of the subdomains in example.com. For the purposes of DNSDB Queries wildcards are more similar to the Kleene Star in mathematics and regular expressions. E.g.www.example.*represents all occurrences ofwww.exampleacross all TLDs and suffixes. - DNS Record Types:
- A Record: An IPv4 resource record type used to map a domain name to an IPv4 address.
- AAAA Record: An IPv6 resource record type used to map a domain name to an IPv6 address. Commonly pronounced quad-ei.
- NS Record: A resource record type used to indicate which DNS server is authoritative for a given domain, a name server. These are often redundantly used to indicate secondary and fallback servers.
- MX Record: A resource record type used to direct mail traffic for a domain, for mail exchangers. These often have priorities assigned to them for mail delivery redundantly.
- CNAME Record: A resource record type used to alias or canonically relabel a domain or subdomain to another domain. E.g.
www.bbc.comis a CNAME that resolves to the same IP address aswww-bbc-com.bbc.net.uk. - TXT Record: A resource record type used to hold additional notes for a domain. Commonly used for email authentication.
- PTR Record: A record type used to map an IPv4 address to a FQDN, in the opposite fashion of an A Record. Used for reverse DNS lookups.
- Special Characters:
- IDN: Internationalized Domain Name; a domain name that contains language-specific script or alphabet elements such as Arabic, Chinese, Cyrillic, Hebrew, etc. E.g. bbc.在线
- Punycode: The ASCII representation of an IDN, used as a conversion layer for domain names that contain language-specific scripts or alphabet elements. E.g.
bbc.xn--3ds443g - Homoglyphs: A text character that looks similar to another. In DNS, it’s typically seen as part of an IDN. E.g. a (Latin) looks like the completely different characters а (Cyrillic) and α (Greek).
- FQDN: Fully Qualified Domain Name; a domain name that has all of elements required to make it unambiguous when parsing. At minimum, from right to left, one is comprised of a period, top level domain, a period separator, and a name. E.g.
References
- The greater part of this guide was adapted from Joe St Sauver’s 8 Common DNSDB “Pivots” for Threat Hunting
- For more information about IDNs, Homographs, and Punycode please see Mike Schiffman’s Farsight Security Global Internationalized Domain Name Homograph Report
- For more information about DNSDB Time Fencing please see Joe St Sauver’s Farsight’s DNSDB Time Fencing: A Post-Attack “Time Machine”